Scripts
Questions
Why are command line programs useful, compared to Jupyter notebooks and similar?
How to create a Python script?
How to generalize a Python script?
Objectives
Learn how to streamline your Python notebooks by creating repeatable Python scripts
Learn how to import other Python files
Learn to parse command line arguments in Python
Why scripts?
So far we have been learning Python using Jupyter notebooks. It is very convenient: it allowed us to experiment and prototype Python code so we may think that is more than enough for your day to day work.
But after several weeks of hard work with Python, you may end up:
either with 10 different notebooks (so that you can run them concurrently)
or with a very long notebook which is becoming hardly readable!
Let’s imagine you have created 10 notebooks to run for 10 different input parameters and now you are willing to experiment with 1000 sets of input parameters. Suppose you find a bug in the original notebook and need to rerun everything: are you willing to re-create manually your 1000 notebooks?
In this episode, we will learn how to automate your work using Python scripts so that
you do not need to manually configure your notebooks to be able to run with different parameters
can easily run you work via other tools, such as on computing clusters.
From Jupyter notebooks to Python scripts
Save as Python script
Jupyter notebooks can be parameterized for instance using papermill. It can be an attractive approach when you have short notebooks (to generate automatically plots/reports) but as soon as you have more complex tasks to execute, we strongly recommend to generate Python scripts. This will also force you to modularize your code. See CodeRefinery’s lesson on Modular code development.
You need to convert the notebook to a Python file. Check the JupyterLab documentation for more information. You can get a command line by (File → New Launcher → Terminal - if you go through New Launcher, your command line will be in the directory you are currently browsing), you can convert files in the terminal by running:
$ jupyter nbconvert --to script your_notebook_name.ipynb
If nbconvert doesn’t work, within JupyterLab, you can export any Jupyter notebook to a Python script, but this downloads it to your own computer and then you need to copy it to a place you are working (maybe upload it back to JupyterLab?):
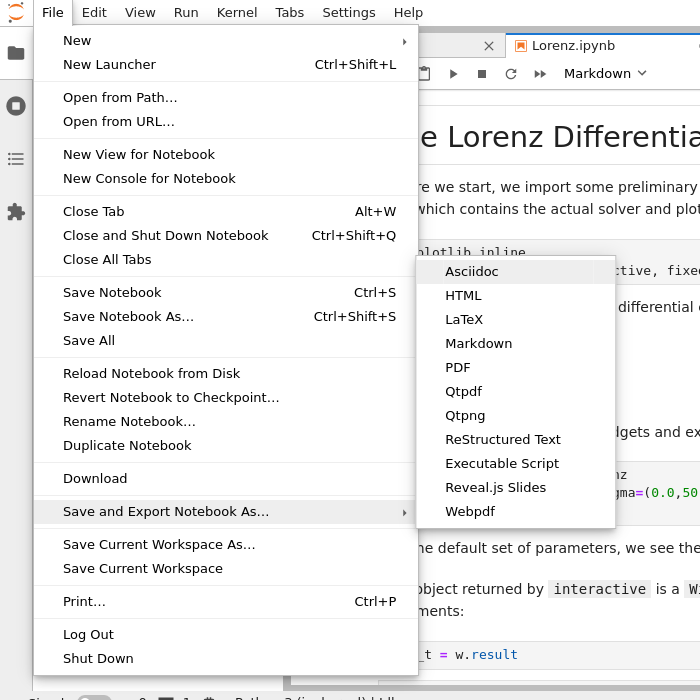
Select File (top menu bar) → Export Notebook as → Export notebook to Executable Script.
Exercises 1
Scripts-1
Download the
weather_observations.ipynband upload them to your Jupyterlab. The script plots the temperature data for Tapiola in Espoo. The data is originally from rp5.kz and was slightly adjusted for this lecture.Hint: Copy the URL above (right-click) and in JupyterLab, use File → Open from URL → Paste the URL. It will both download it to the directory JupyterLab is in and open it for you.
Open a terminal in Jupyter: File → New Launcher, then click “Terminal” there. (if you do it this way, it will be in the right directory. File → New → Terminal might not be.)
Convert the Jupyter script to a Python script by calling:
$ jupyter nbconvert --to script weather_observations.ipynb
Run the script (note: you may have
python3rather thanpython):$ python weather_observations.py
Command line arguments with sys.argv
We now have a Python script that is callable from the command line (e.g. for use on an HPC system).
However, this code is still not adjustable, as we still need to have a copy for each single
time range we want to plot, or need to modify our file whenever we want to just change parameters.
What we need is to allow the code to do something different based on something outside the code itself: in this case, to
plot information for different time ranges. This can be achieved by
using Pythons sys package, which provides access to arguments given to the Python interpreter at
startup in the sys.argv list. The first (i.e. sys.argv[0] entry of this array is the script that is running,
and any further argument (separated by space) is appended to this list, like such:
$ python my_script.py A B
$ # sys.argv[1] is 'A'
$ # sys.argv[2] is 'B'
Lets see how it works: We modify the weather_observations.py script such that we allow start
and end times as well as the output file to be passed in as arguments
to the function. Open it (find the .py file from the JupyterLab
file browser) and make these edits:
import sys
import pandas as pd

# define the start and end time for the plot
start_date = pd.to_datetime(sys.argv[1], dayfirst=True)
end_date = pd.to_datetime(sys.argv[2], dayfirst=True)
...

# select the data
weather = weather[weather['Local time'].between(start_date,end_date)]
...

# save the figure
output_file_name = sys.argv[3]
fig.savefig(output_file_name)
We can try it out (see the file spring_in_tapiola.png made in the
file browser):
$ python weather_observations.py 01/03/2021 31/05/2021 spring_in_tapiola.png
Discussion
Does it work?
Why is this better than modifying the script every time I want it to plot data for a different period?
What problems do you expect when using this approach (using
sys.argv)?
This approach is brittle and more robust solutions exist that allow you to fully customize your scripts and generate help texts at the same time:
Parsing command line arguments with argparse
Argparse not only gives you descriptive command line arguments, it also automatically
generates a --help option for you. To use argparse you first set up a parser
by calling parser = argparse.ArgumentParser() and then you add arguments using
parser.add_argument(args). There are two different types of arguments:
Positional arguments
Optional arguments
Positional arguments are detected by their order, while optional arguments need to be
given with their respective flags ( like --name or -n).
The following example would parse a positional argument Name of type string
and an optional argument date of type string which defaults to 01/01/2000.
import argparse

parser = argparse.ArgumentParser()
# One positional and one optional argument
parser.add_argument('name', type=str, metavar="N",
                    help="The name of the subject")
parser.add_argument('-d', '--date', type=str, default="01/01/2000",
                    help="Birth date of the subject")

args = parser.parse_args()

print(args.name + " was born on " + args.date)
If this code was in birthday.py and we would call python birthday.py --help it
would show the following message:
$ python birthday.py --help
usage: birthday.py [-h] [-d DATE] N

positional arguments:
  N                     The name of the subject

optional arguments:
  -h, --help            show this help message and exit
  -d DATE, --date DATE  Birth date of the subject
Exercises 2
Scripts-2
Take the Python script (
weather_observations.py) we have written in the preceding exercise and useargparseto specify the input (URL) and output files and allow the start and end dates to be set.Hint: try not to do it all at once, but add one or two arguments, test, then add more, and so on.
Hint: The input and output filenames make sense as positional arguments, since they must always be given. Input is usually first, then output.
Hint: The start and end dates should be optional parameters with the defaults as they are in the current script.
Execute your script for a few different time intervals (e.g. from January 2019 to June 2020, or from May 2020 to October 2020). Also try using this data for Cairo:
https://raw.githubusercontent.com/AaltoSciComp/python-for-scicomp/master/resources/data/scripts/weather_cairo.csv
Solution
import pandas as pd
import argparse

parser = argparse.ArgumentParser()
parser.add_argument("input", type=str, help="Input data file")
parser.add_argument("output", type=str, help="Output plot file")
parser.add_argument("-s", "--start", default="01/01/2019", type=str, help="Start date in DD/MM/YYYY format")
parser.add_argument("-e", "--end", default="16/10/2021", type=str, help="End date in DD/MM/YYYY format")

args = parser.parse_args()

# load the data
weather = pd.read_csv(args.input,comment='#')

# define the start and end time for the plot
start_date=pd.to_datetime(args.start, dayfirst=True)
end_date=pd.to_datetime(args.end, dayfirst=True)

# preprocess the data
weather['Local time'] = pd.to_datetime(weather['Local time'], dayfirst=True)
# select the data
weather = weather[weather['Local time'].between(start_date,end_date)]

# plot the data
import matplotlib.pyplot as plt
# start the figure.
fig, ax = plt.subplots()
ax.plot(weather['Local time'], weather['T'])
# label the axes
ax.set_xlabel("Date of observation")
ax.set_ylabel("Temperature in Celsius")
ax.set_title("Temperature Observations")
# adjust the date labels, so that they look nicer
fig.autofmt_xdate()

# save the figure
fig.savefig(args.output)
Discussion
What was the point of doing this?
Now you can do this:
$ python weather_observations.py --help
$ python weather_observations.py https://raw.githubusercontent.com/AaltoSciComp/python-for-scicomp/master/resources/data/scripts/weather_tapiola.csv temperature_tapiola.png
$ python weather_observations.py -s 1/12/2020 -e 31/12/2020 https://raw.githubusercontent.com/AaltoSciComp/python-for-scicomp/master/resources/data/scripts/weather_tapiola.csv temperature_tapiola_dec.png
$ python weather_observations.py -s 1/2/2021 -e 28/2/2021 https://raw.githubusercontent.com/AaltoSciComp/python-for-scicomp/master/resources/data/scripts/weather_tapiola.csv temperature_tapiola_feb.png
$ python weather_observations.py https://raw.githubusercontent.com/AaltoSciComp/python-for-scicomp/master/resources/data/scripts/weather_cairo.csv temperature_cairo.png
We can now process different input files without changing the script.
We can select multiple time ranges without modifying the script.
We can easily save these commands to know what we did.
This way we can also loop over file patterns (using shell loops or similar) or use the script in a workflow management system and process many files in parallel.
By changing from
sys.argvtoargparsewe made the script more robust against user input errors and also got a help text (accessible via--help).
Load larger option lists using config files
In the above example we only allowed the input and output files along with start and end dates to be selected by command line arguments. This already leads to a quite large command line call. Now imagine, that we also want to allow the user to select more specific information from the dataset, define specific X and Y labels, write their own title etc. Now imagine to put all this into the command line:
$ python weather_observations.py --input https://raw.githubusercontent.com/AaltoSciComp/python-for-scicomp/master/resources/data/scripts/weather_cairo.csv --output rain_in_tapiola.png --xlabel "Days in June" --ylabel "Rainfall in mm" --title "Rainfall in Cairo" --data_column RRR --start 01/06/2021 --end 30/06/2021
This is an even larger line, needs scrolling and becomes quite inconvenient to modify.
Instead of putting all of this into the command line, you could think about storing and modifying the arguments in a config file.
There are several ways, how config files can be stored. You can use a simple Parameter = Value
format, and parse it yourself, or you can use e.g. the JSON or YAML formats.
For both parsers exist that can save you some work, and both formats also allow you to use
more complex input data, like lists, or dictionaries. We won’t go into the details of the formats, and will only give
a short example using YAML here.
The YAML file format can be simple or very complex allowing a large variety of data structures to be stored.
One benefit of YAML is that there is already a Python module (yaml) available for parsing it and it
directly parses numbers as numbers and text as strings, making conversions unnecessary (the same is true for JSON
with the json package).
The Python module optionsparser.py provides a simple parser for YAML styled options files.
Similar to argparse, it takes a dict of required options, along with a dict of optional parameters.
Required arguments need to specify a type. Optional argument types are derived from their default values.
In our example above, we could for example add optional parameters that allow the selection of other weather data from the dataset (precipitation …), set the labels and titles explicitly etc.
In the YAML format, names and values are separated by :. Our above example would therefore translate to the following YAML file:
input:        https://raw.githubusercontent.com/AaltoSciComp/python-for-scicomp/master/resources/data/scripts/weather_cairo.csv
output:       rain_in_cairo.png
xlabel:       Days in June
ylabel:       Rainfall in mm
title:        Rainfall in Cairo
data_column:  RRR
start:        01/06/2021
end:          30/06/2021
Exercises 3 (optional)
Scripts-3
Download the
optionsparser.pyfunction and load it into your working folder in Jupyterlab (Hint: in JupyterLab, File → Open from URL). Modify the previous script to use a config file parser to read all arguments. The config file is passed in as a single argument on the command line (using e.g.argparseorsys.argv) still needs to be read from the command line.Run your script with different config files.
Solution
The modified weather_observations.py script:
#!/usr/bin/env python
# coding: utf-8

import pandas as pd
from optionsparser import get_parameters
import argparse

# Lets start reading our confg file. we'll use argparse to get the config file.
parser = argparse.ArgumentParser()
parser.add_argument('input', type=str,
                    help="Config File name ")
args = parser.parse_args()

# Set optional parameters with default values and required parameter values with their type
defaults = {
           "xlabel"      : "Date of observation",
           "title"       : "Weather Observations",
           "start"       : "01/06/2021",
           "end"         : "01/10/2021",
           "output"      : "weather.png",
           "ylabel"      : "Temperature in Celsius",
           "data_column" : "T",
           }

required = {
           "input"  : str
           }

# now, parse the config file
parameters = get_parameters(args.input, required, defaults)

# load the data
weather = pd.read_csv(parameters.input,comment='#')

# obtain start and end date
start_date=pd.to_datetime(parameters.start, dayfirst=True)
end_date=pd.to_datetime(parameters.end, dayfirst=True)

# Data preprocessing
weather['Local time'] = pd.to_datetime(weather['Local time'], dayfirst=True)
# select the data
weather = weather[weather['Local time'].between(start_date,end_date)]

# Data plotting
import matplotlib.pyplot as plt
# start the figure.
fig, ax = plt.subplots()
ax.plot(weather['Local time'], weather['T'])
# label the axes
ax.set_xlabel("Date of observation")
ax.set_ylabel("Temperature in Celsius")
ax.set_title("Temperature Observations")
# adjust the date labels, so that they look nicer
fig.autofmt_xdate()


# save the figure
fig.savefig(parameters.output)
What did this config file parser get us? Now, we have separated the code from the configuration. We could save all the configuration in version control - separately and have one script that runs them. If done right, our work could be much more reproducible and understandable.
Further reading
Linking Jupyterlab notebooks to python scripts (making linking
.py- and.ipynb-files easier) using jupytextThe wikipedia page about YAML contains a lot of additional information on the YAML syntax.
The Coderefinery Lesson about reproducible research can give additional information about good coding practices and workflow automation.