Software installation
This course is interactive and demonstrates many different tools. Thus, even beyond Python, extra software (Python libraries) needs to be installed. This page contains the instructions.
Once the course starts, we don’t have time to stop for installing software.
Please make sure before the course that you have all the required software installed or some other way access to it. For example, the workshop could be done with a remote Jupyter server, as long as you can use the terminal from the Jupyter (you need to be able to access the command line for some lessons).
Do you need help?
Participants from a partner institution are invited to install help sessions. (Hint: ask your institution to become a partner if it isn’t already!)
Otherwise, if you need installation help, show this page to someone around you and they can probably help. These are relatively standard tools.
Don’t be afraid to ask for help. Installing scientific software is harder than it should be and it helps to have someone guide you through it.
Python
We expect you to have a working Python installation with some common libraries. We currently recommend Miniforge, which includes the base and packages through a different, freely usable channel. You can explore the options in the tabs below.
Python, conda, anaconda, miniforge, etc?
Unfortunately there’s a lot of jargon. We’ll go over this in the course but here is a crash course:
Python is a programming language very commonly used in science, it’s the topic of this course.
Conda is a package manager: it allows distributing and installing packages, and is designed for complex scientific code.
Mamba is a re-implementation of Conda to be much faster with resolving dependencies and installing things.
An Environment is a self-contained collections of packages which can be installed separately from others. They are used so each project can install what it needs without affecting others.
Anaconda is a commercial distribution of Python+Conda+many packages that all work together. It used to be freely usable for research, but since ~2023-2024 it’s more limited. Thus, we don’t recommend it (even though it has a nice graphical user interface).
conda-forge is another channel of distributing packages that is maintained by the community, and thus can be used by anyone. (Anaconda’s parent company also hosts conda-forge packages)
miniforge is a distribution of conda pre-configured for conda-forge. It operates via the command line.
miniconda is a distribution of conda pre-configured to use the Anaconda channels.
This is our recommended method - it can be used for any purpose and makes a strong base for the future.
Follow the instructions on the miniforge web page. This installs the base, and from here other packages can be installed.
Miniforge uses the command line - this gives you the most power but can feel unfamiliar. See the command line crash course for an intro.
Anaconda is easier to get started with, but may be more limiting in the future. The Anaconda Navigator provides a graphical interface to most of what you would need.
The Anaconda Python distribution conveniently packages everything, but its license has does not allow large organizations to use it for free (and has actually been enforced against universities).
Note the license of Anaconda - there were recently issues with it being used by large universities for free, and this is not yet fully resolved.
There are many ways to install Python. Other methods can work,
as long as you can install the libraries from the
environment.yml file mentioned in the Miniforge
instructions.
We don’t currently provide a requirements.txt for installing
the required packages without Conda/Mamba, though.
Starting Python
You need to Python in a way that activates conda/mamba.
Linux/MacOS: Each time you start a new command line terminal, you can activate Miniforge by running. This is needed so that Miniforge is usable wherever you need, but doesn’t affect any other software on your computer (this is not needed if you choose “Do you wish to update your shell profile to automatically initialize conda?”, but then it will always be active):
$ source ~/miniforge3/bin/activate
Windows: Use the “Miniforge Prompt” to start Miniforge. This
will set up everything so that conda and mamba are
available.
The Anaconda Navigator provides a convenient way to access the software. It can be installed from that page.
You are on your own here.
Python for SciComp software environment
Once Python and conda/mamba are installed, you can use it to install an environment. An environment is a self-contained set of extra libraries - different projects can use different environments to not interfere with each other. This environment will have all of the software needed for this particular course.
This environment file
contains all packages needed for the course, and can be
installed with. The following command will install an
environment named python-for-scicomp (there may be lots of
warning messages: this is OK if it still goes through):
$ mamba env create -n python-for-scicomp -f https://raw.githubusercontent.com/AaltoSciComp/python-for-scicomp/master/software/environment.yml
$ mamba env create -n python-for-scicomp -f https://raw.githubusercontent.com/AaltoSciComp/python-for-scicomp/master/software/environment.yml
Each time you start a new command line, you need to activate miniforge and this environment:
$ source ~/miniforge3/bin/activate
$ conda activate python-for-scicomp
$ # Start the Miniforge Prompt.
$ conda activate python-for-scicomp
Anaconda includes most of the things needed for the course automatically, but as of 2024 not everything. You can use the navigator to create new environments from this this environment file. You’ll have to download it and then import it.
When running this course’s exercise, make sure the
python-for-scicomp environment is activated before starting
JupyterLab or any code. You need to start termnials or
JupyterLab from the Anaconda Navigator for the
python-for-scicomp environment to be used.
Minoconda, Anaconda command line, other conda/mamba command line tools: see “Miniforge” instructions.
Virtual environments: we don’t currently provide a
requirements.txt but many package names can probably be
copied from the environment.yml file. We really recommend
conda/mamba based systems: it’s designed for complex scientific
software.
Any other Python distribution which you can install libraries into would work, but because there are so many different ways to do this, we don’t support them. You would need the extra libraries mentioned in the Miniforge instructions.
Remember you need to activate the environment each time you use it.
JupyterLab
We do most of the lessons from JupyterLab (and JupyterLab provides most of the other tools we need).
JupyterLab was instaled in the previous step. To run it, first, start the Miniforge command line interface. Remember, you may need to activate Miniforge and the environment first.
$ source ~/miniforge3/bin/activate
$ conda activate python-for-scicomp
$ jupyter-lab
$ # Start the Miniforge Prompt.
$ conda activate python-for-scicomp
$ jupyter-lab
If you install the full Anaconda distribution, this will be available and can be started either through Anaconda Navigator or command line.
Make sure the python-for-scicomp environment is selected and
you can start JupyterLab.
Verification of Python and JupyterLab
Watch the video
See this verification in video form - if you can do this, you are ready to go for day one. Your exact steps may be a bit different.
Remember that you need to activate the environment first - see the step above.
You can start JupyterLab from the command line:
$ jupyter-lab
(... Jupyter starts in a web browser)
You should be able to start JupyterLab. You can do this from the Anaconda Navigator (recommended if you have it):

Starting JupyterLab from the Anaconda Navigator.
… or you can start JupyterLab from the command line:
$ jupyter-lab
(... Jupyter starts in a web browser)
Verify that you can start a Jupyter notebook. We will learn how to
do this in day 1, but you can try running print("Hello, world!")
if you want.
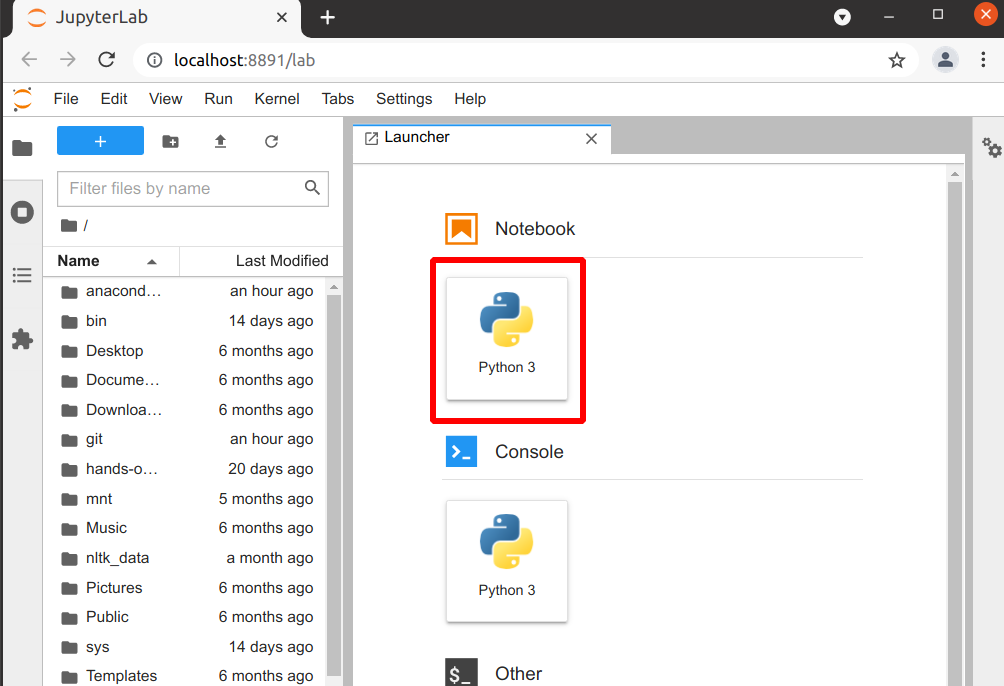
Starting a Jupyter Notebook from JupyterLab.
Text editor
For one portion of the course, you will need a text editor. If you don’t know what to use, you can use the text editor that comes from JupyterLab and it will do everything you need - no extra installation needed.
Other editors
Because we need to be simple in our teaching, we only teach the most basic editors. We encourage you to try out more advanced ones yourself.
For other editors, see the CodeRefinery instructions. You don’t exactly need a terminal editor - the graphical ones, such as VSCode or whatever you use now, will work as well.
Command line
You need access to the command line for some lessons. JupyterLab includes it, so no extra installation is needed. If you want to test in advance:
You can start it from JupyterLab (recommended):

From the JupyterLab launcher, select “Terminal”.
Other ways to access the command line
From the Anaconda Navigator:
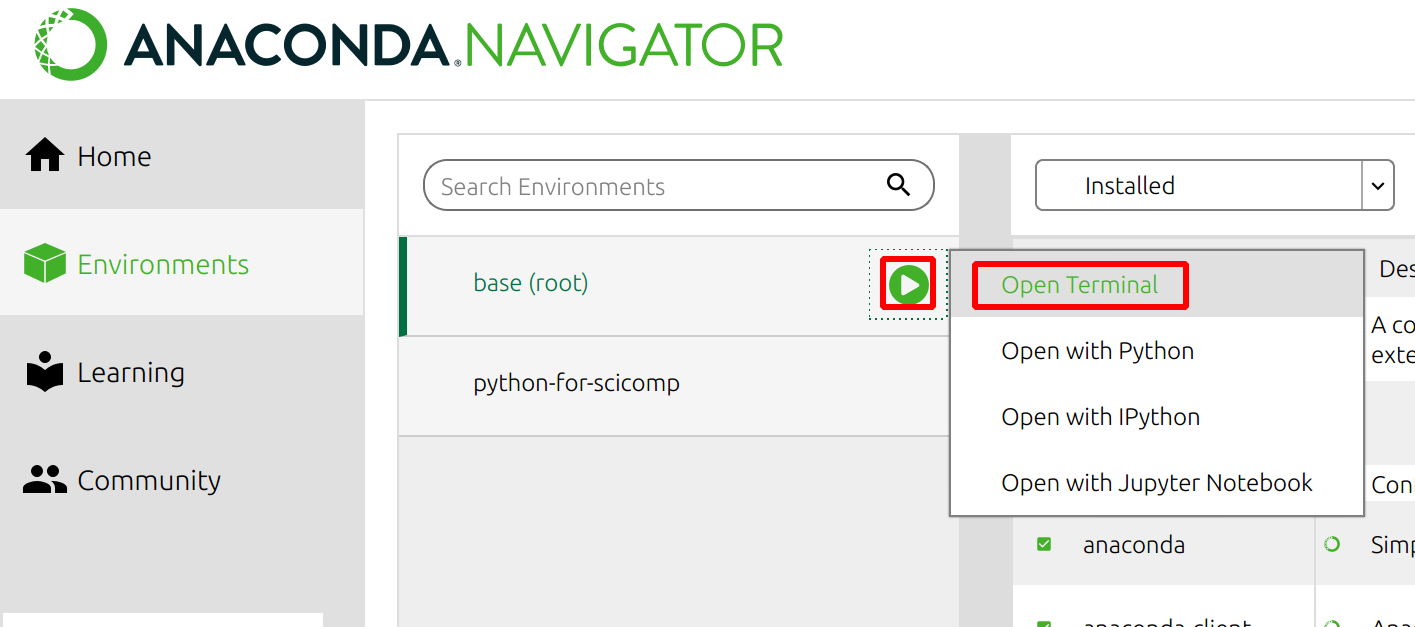
From the Anaconda Navigator, you can select “environments” on the left, then click on one, then the arrow, then “Open terminal”.
From your operating system’s terminal applications, if you activate Anaconda.
Verification of the command line
To verify command line usage, type the following commands (without the
$), and you should see the corresponding output that lists the
Python version:
$ python3 -V
Python 3.8.3

## Or python... if it's installed as that
$ python -V
Python 3.8.3
Any recent version of Python 3 should work for the course (for example 3.8 or higher).
Zoom
If this is an online workshop, it might use Zoom. You can see CodeRefinery instructions for it.
Need help?
If you have access, come to one of the installation help sessions. Or, ask your colleagues: these are standard tools and you can definitely find someone can help you get set up!