Packaging
Questions
How to organize Python projects larger than one script?
What is a good file and folder structure for Python projects?
How can you make your Python functions most usable by your collaborators?
How to prepare your code to make a Python package?
How to publish your Python package?
Objectives
Learn to identify the components of a Python package
Learn to create a Python package
Learn to publish a Python package
Organizing Python projects
Python projects often start as a single script or Jupyter notebook but they can grow out of a single file.
In the Scripts episode we have also learned how to import functions and objects from other Python files (modules). Now we will take it a step further.
Recommendations:
Collect related functions into modules (files).
Collect related modules into packages (we will show how).
Add a
LICENSEfile to your code from choosealicense.com (see Software Licensing and Open source explained with cakes).Write a
README.mdfile describing what the code does and how to use it.It is also recommended to document your package.
When the project grows, you might need automated testing.
To have a concrete but still simple example, we will create a project
consisting of 3 functions, each in its own file. We can then imagine that each
file would contain many more functions. To make it more interesting,
one of these functions will depend on an external library: scipy.
These are the 3 files:
def add(x, y):
    return x + y
def subtract(x, y):
    return x - y
from scipy import integrate


def integral(function, lower_limit, upper_limit):
    return integrate.quad(function, lower_limit, upper_limit)
We will add a fourth file:
"""
Example calculator package.
"""

from .adding import add
from .subtracting import subtract
from .integrating import integral

__version__ = "0.1.0"
This __init__.py file will be the interface of our package/library.
It also holds the package docstring and the version string.
Note how it imports functions from the various modules using relative imports
(with the dot).
After that let’s create a file called README.md to the project root
that will describe our project to other people who might want to use it.
# calculator

Great calculator with amazing mathematics functions:

- `calculator.adding.add`: Adds numbers
- `calculator.subtracting.subtract`: Subtracts numbers
- `calculator.integrating.integral`: Integrate functions
Now our folder should look something like this:
calculator_myname
├── calculator
│   ├── adding.py
│   ├── __init__.py
│   ├── integrating.py
│   └── subtracting.py
└── README.md
After this we need to create a file called
pyproject.toml,
which describes our package.
To make this easier we’ll use flit (which is already installed in the
course environment) in a terminal to initialize it:
$ flit init
Module name [calculator]: calculator_myname
Author: Firstname Lastname
Author email: firstname.lastname@example.org
Home page: http://www.example.org
Choose a license (see http://choosealicense.com/ for more info)
1. MIT - simple and permissive
2. Apache - explicitly grants patent rights
3. GPL - ensures that code based on this is shared with the same terms
4. Skip - choose a license later
Enter 1-4: 1

Written pyproject.toml; edit that file to add optional extra info.
flit will ask us questions about your project and it create a
pyproject.toml into the project folder. The name of the package
(Module name) should be something that is not already in use. In best
case scenario it should be the same as the Python module name. In our
case, let’s use a different name and let’s fix this later.
This is how we will arrange the files in the project folder/repository:
calculator_myname
├── calculator
│   ├── adding.py
│   ├── __init__.py
│   ├── integrating.py
│   └── subtracting.py
├── LICENSE
└── README.md
Now we are ready to test the package. For this we need to be in the “root”
folder, what we have called the project-folder. We also need to have
scipy available in our environment:
from calculator import add, subtract, integral

print("2 + 3 =", add(2, 3))
print("2 - 3 =", subtract(2, 3))
integral_x_squared, error = integral(lambda x: x * x, 0.0, 1.0)
print(f"{integral_x_squared = }")
The package is not yet pip-installable, though. We will make this possible in the next section.
Testing a local pip install
The pyproject.toml specification tells Pip what our package is and
what it should install. It currently looks like this:
[build-system]
requires = ["flit_core >=3.11,<4"]
build-backend = "flit_core.buildapi"

[project]
name = "calculator_myname"
authors = [{name = "Firstname Lastname", email = "firstname.lastname@example.org"}]
readme = "README.md"
license = "MIT"
license-files = ["LICENSE"]
dynamic = ["version", "description"]

[project.urls]
Home = "http://www.example.org"
Let’s do couple of finishing touches to it. Because we have different names for the package and our module import, we’ll add a section that specifies that.
We also need to add the dependency to scipy.
After the changes our pyproject.toml looks like this:
[build-system]
requires = ["flit_core >=3.11,<4"]
build-backend = "flit_core.buildapi"

[project]
name = "calculator_myname"
authors = [{name = "Firstname Lastname", email = "firstname.lastname@example.org"}]
readme = "README.md"
license = "MIT"
license-files = ["LICENSE"]
dynamic = ["version", "description"]
dependencies = [
    "scipy"
]

[project.urls]
Home = "http://www.example.org"

[tool.flit.module]
name = "calculator"
Note how our package requires scipy and we decided to not pin the version
here (see Version pinning for package creators).
Now we have all the building blocks to test a local pip install. This is a good test before trying to upload a package to PyPI or test-PyPI (see PyPI (The Python Package Index) and conda ecosystem)
Note
Sometime you need to rely on unreleased, development versions as
dependencies and this is also possible. For example, to use the
latest xarray you could add:
dependencies = [
     "scipy",
     "xarray @ https://github.com/pydata/xarray/archive/main.zip"
]
See also
pyOpenSci tutorial on pyproject.toml metadata
Exercise 1
Packaging-1
To test a local pip install:
Create a new folder outside of our example project
Create a new virtual environment and activate it (more on this in Dependency management)
Hint
To create and activate a virtual environment
python -m venv .venv
source .venv/bin/activate
which python
python -m venv .venv
.venv\Scripts\activate
where python
Install the example package from the project folder into the new environment:
pip install --editable /path/to/project-folder/
Test the local installation:
from calculator import add, subtract, integral

print("2 + 3 =", add(2, 3))
print("2 - 3 =", subtract(2, 3))
integral_x_squared, error = integral(lambda x: x * x, 0.0, 1.0)
print(f"{integral_x_squared = }")
Make a change in the
subtractfunction above such that it always returns a floatreturn float(x - y).Open a new Python console and test the following lines. Compare it with the previous output.
from calculator import subtract

print("2 - 3 =", subtract(2, 3))
Tools that simplify sharing via PyPI
The solution that we have used to create the example package (using
setuptools and twine) is not the only approach. There are many ways to
achieve this and we avoided going into too many details and comparisons to not
confuse too much. If you web-search this, you will also see that recently the
trend goes towards using pyproject.toml as more general
alternative to the previous setup.py.
There are at least five tools which try to make the packaging and PyPI interaction easier:
Today, due to standards such as pyproject.toml and pylock.toml, to specify the
package metadata and dependency lock file respectively, the above are largely
cross-compatible amongst each other and with pip.
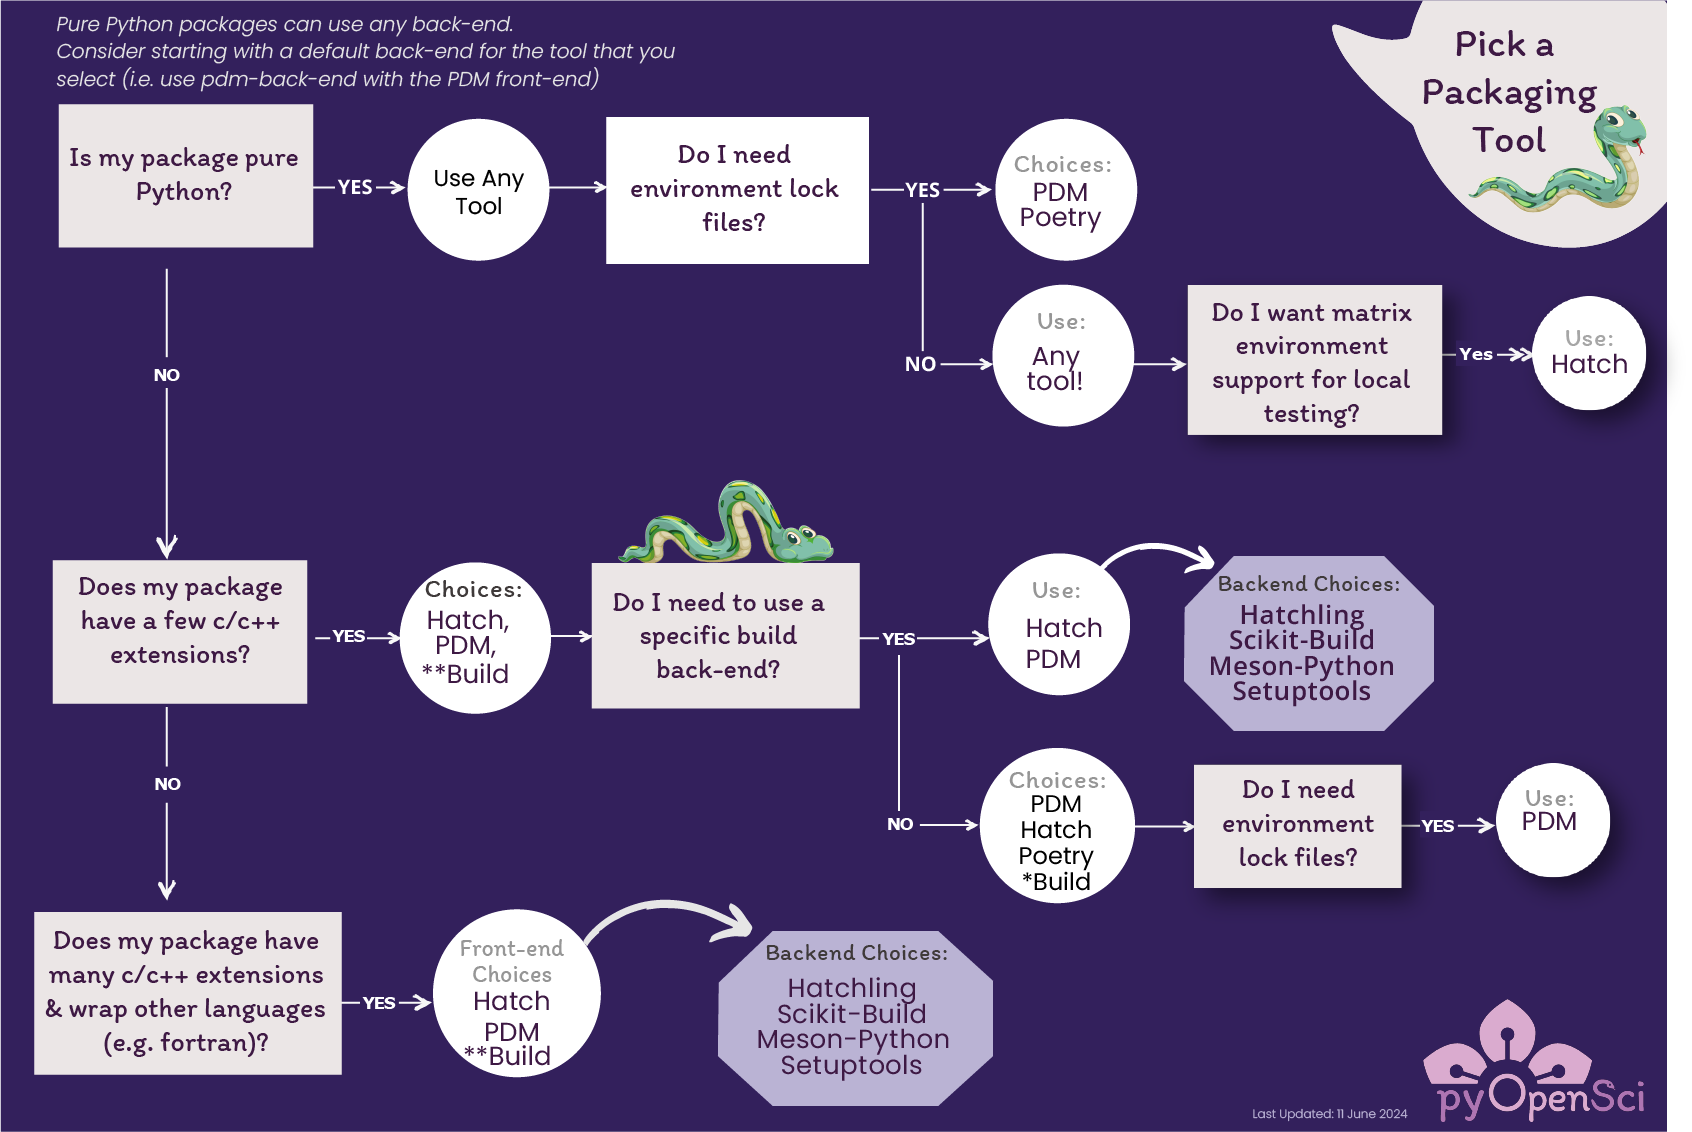
Credits: pyOpenSci’s Python Package Guide licensed CC-BY-SA 4.0
The properties of the project and your development requirements may determine which packaging tool suits you. Use the above decision tree from pyOpenSci to help make that choice.
Tools that simplify sharing conda packages
pixi is package management tool to cover all features of conda, along with ability to initialize and package new projects.
rattler-build is a build tool which combines the functionalities of
conda grayskull,conda buildand allows you to also publish packages.
Publishing a python package
Upload your package to conda-forge: conda-forge is a conda channel: it contains community-led collection of recipes, build infrastructure and distributions for the conda package manager. Anyone can publish conda packages to conda-forge if certain guidelines are respected.
Upload your package to bioconda: bioconda is a very popular channel for the conda package manager specializing in bioinformatics software. As for conda-forge, you need to follow their guidelines when building conda recipes.
You can also create your own conda channel for publishing your packages.
Keypoints
It is worth it to organize your code for publishing, even if only you are using it.
PyPI is a place for Python packages
conda is similar but is not limited to Python